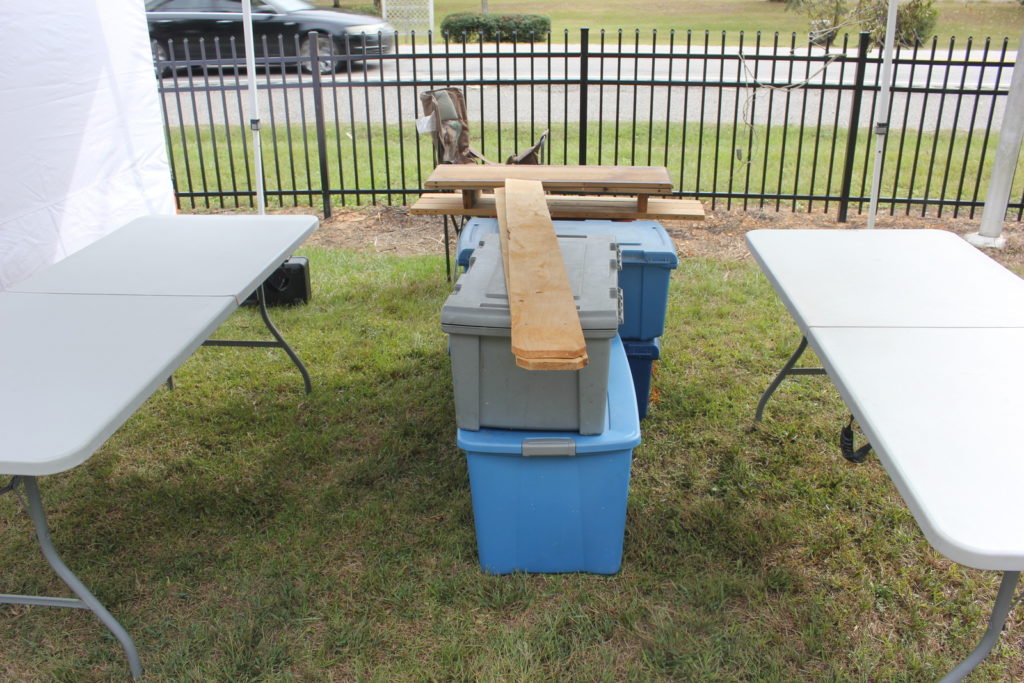
This past weekend, I went out to pioneer days in lochapoka. It is a nice one day show that I typically do well in, but there is always a risk at the outdoor shows of rain and other bad weather .
A tropical storm passed by close to us, and with that comes lots of rain. when the rain comes, the customers usually don’t.
I thought that the show was going to be ruined, but there were still a small number of customers who were buying, and I managed to make a decent amount of sales depite the weather.
rolling of Toomer’s corner after the Mississippi state game
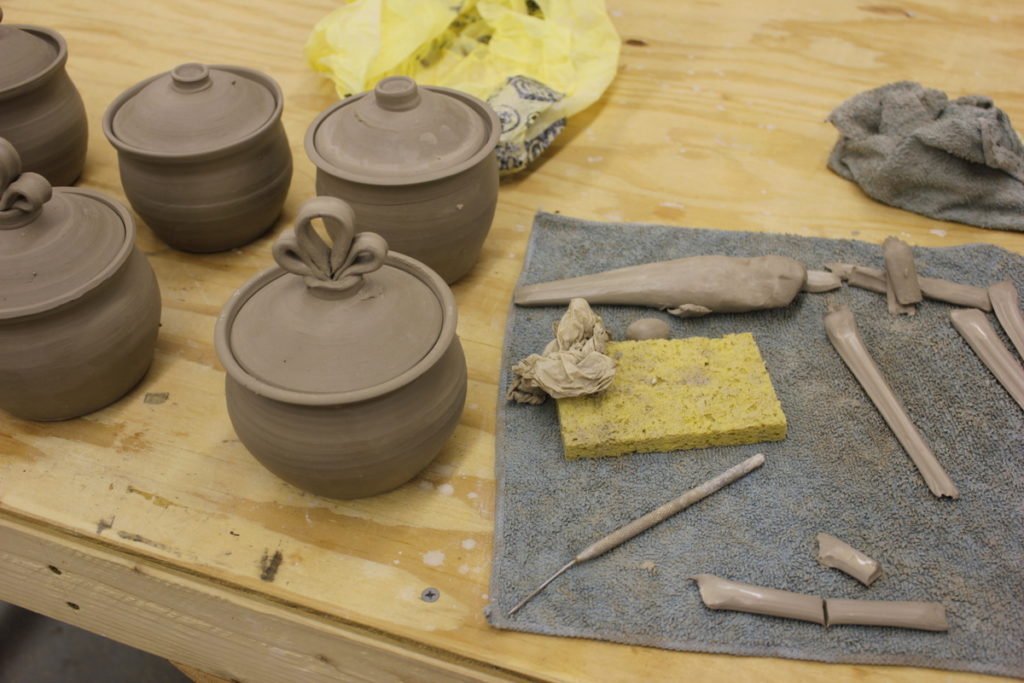
I am still collecting the paper from the rolling of the trees, though i did not get any from the arkansas game because I was tired that day. I take the paper from those rollings, and combine it with my clay, mix it all up and let it dry to a throwing consistency. Maybe I will add a section on how i do this in a few days.
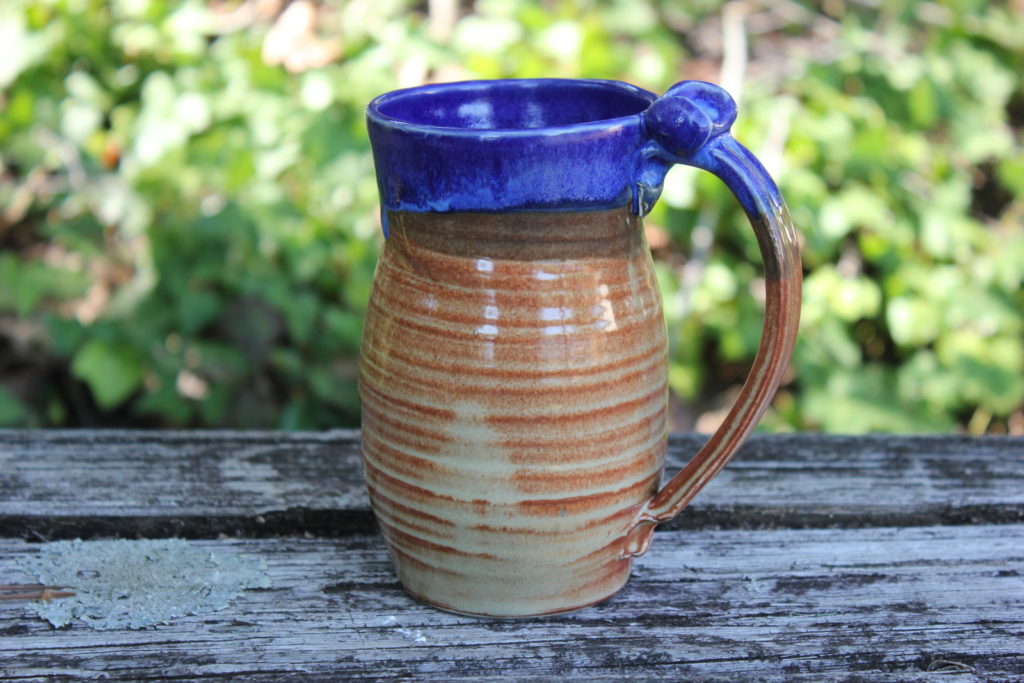
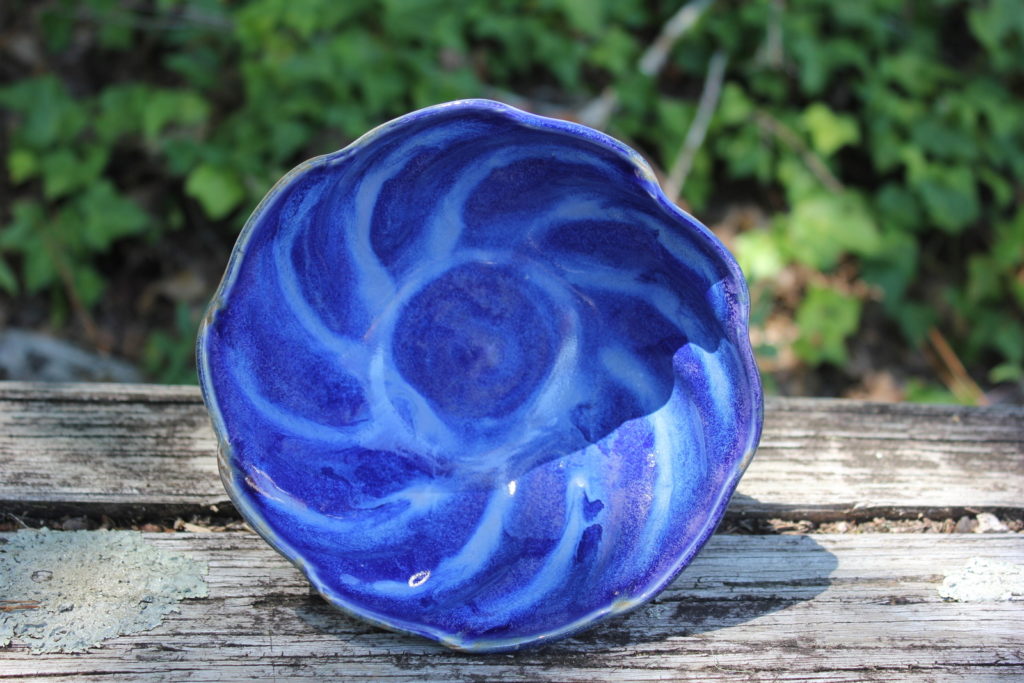
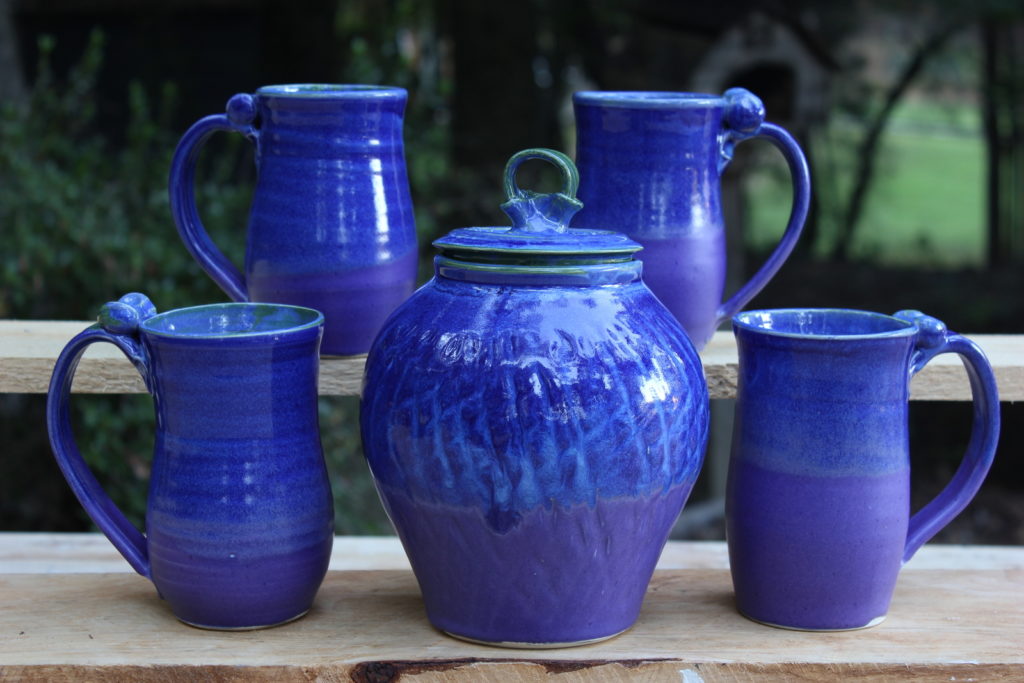
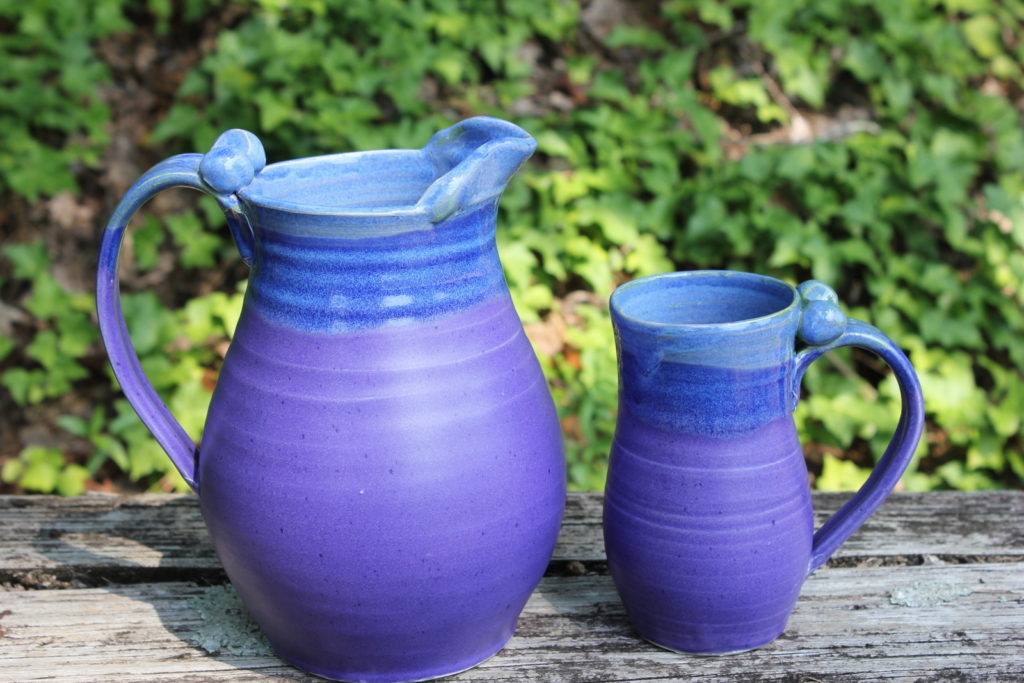
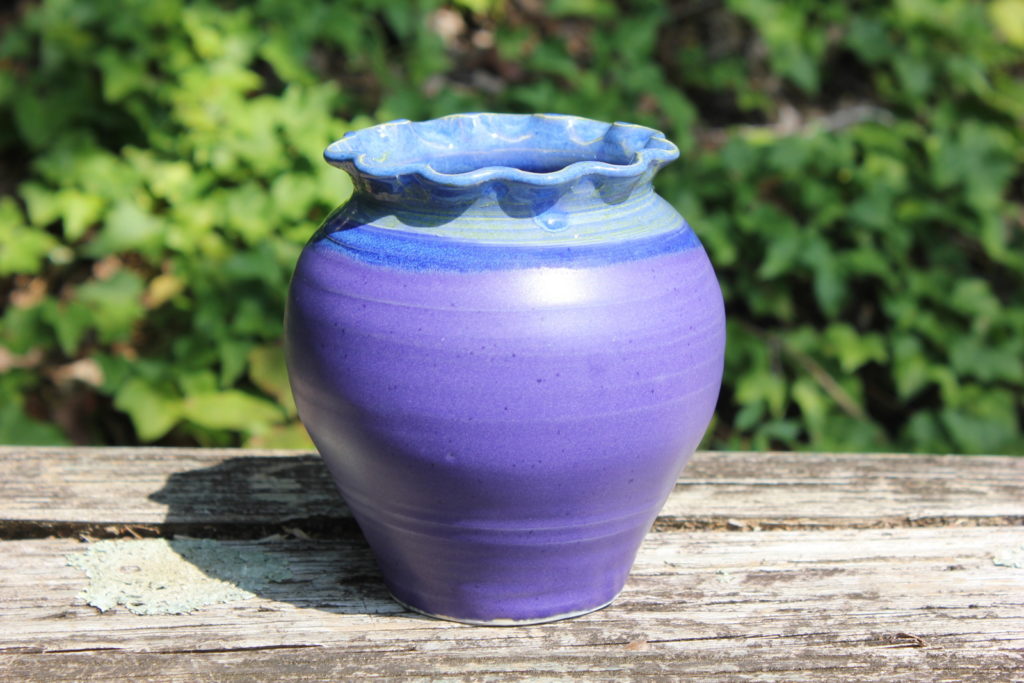
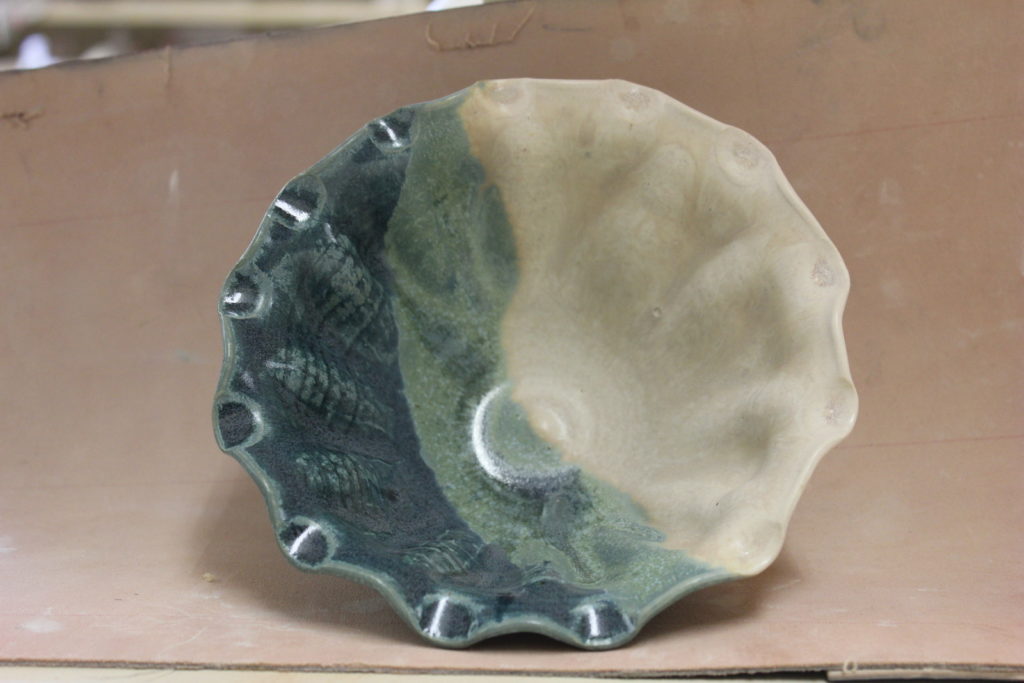
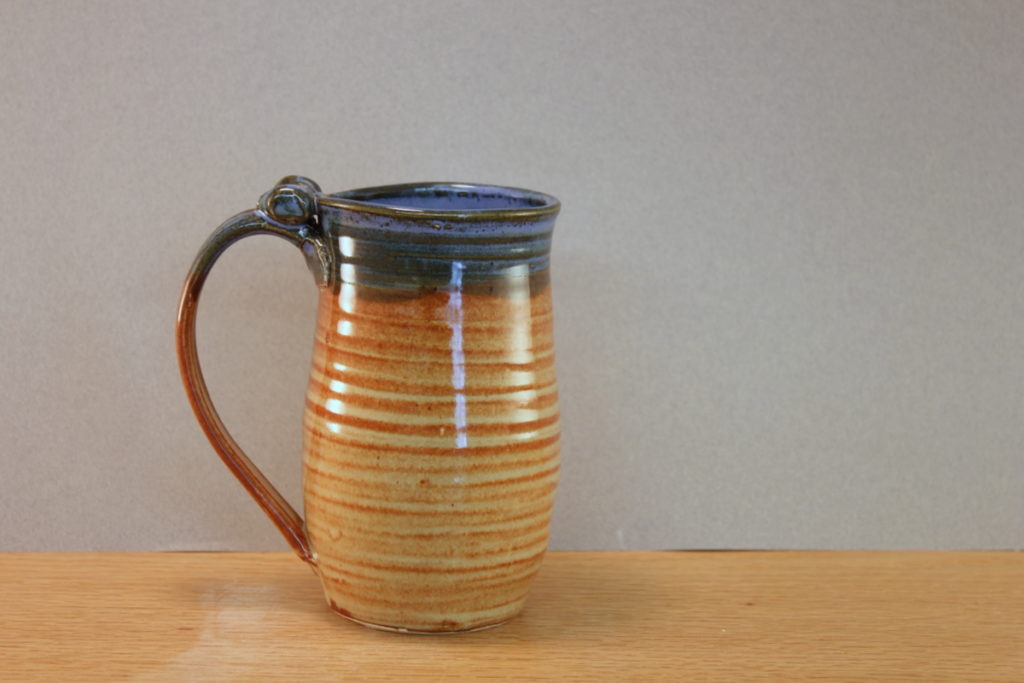
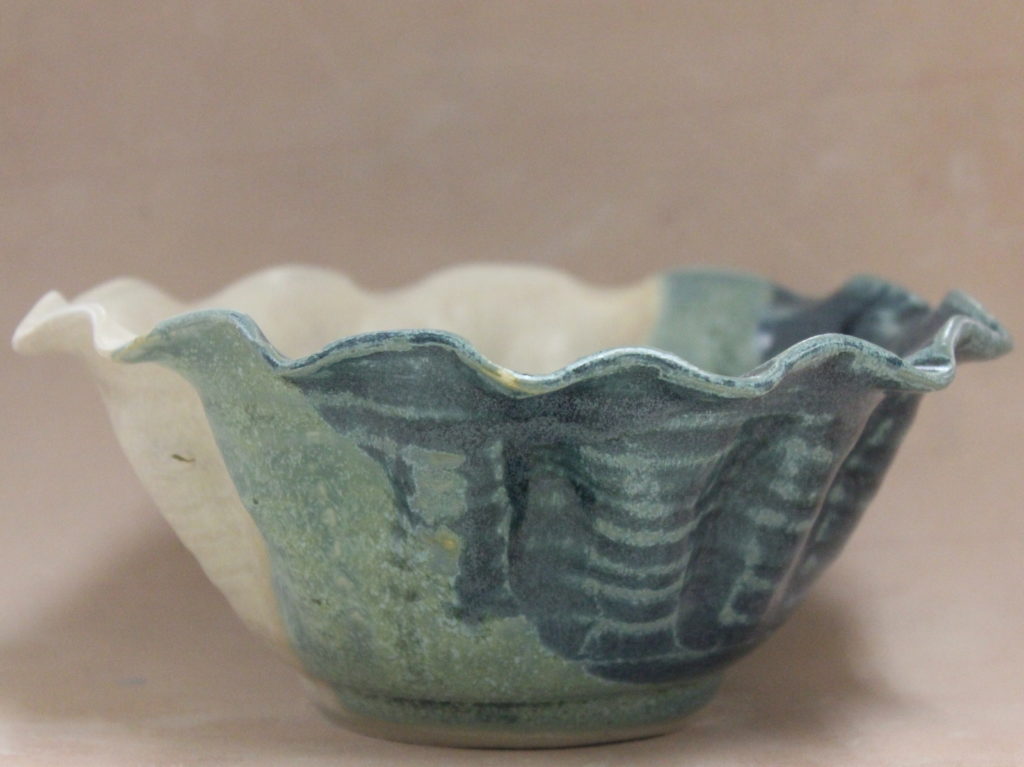
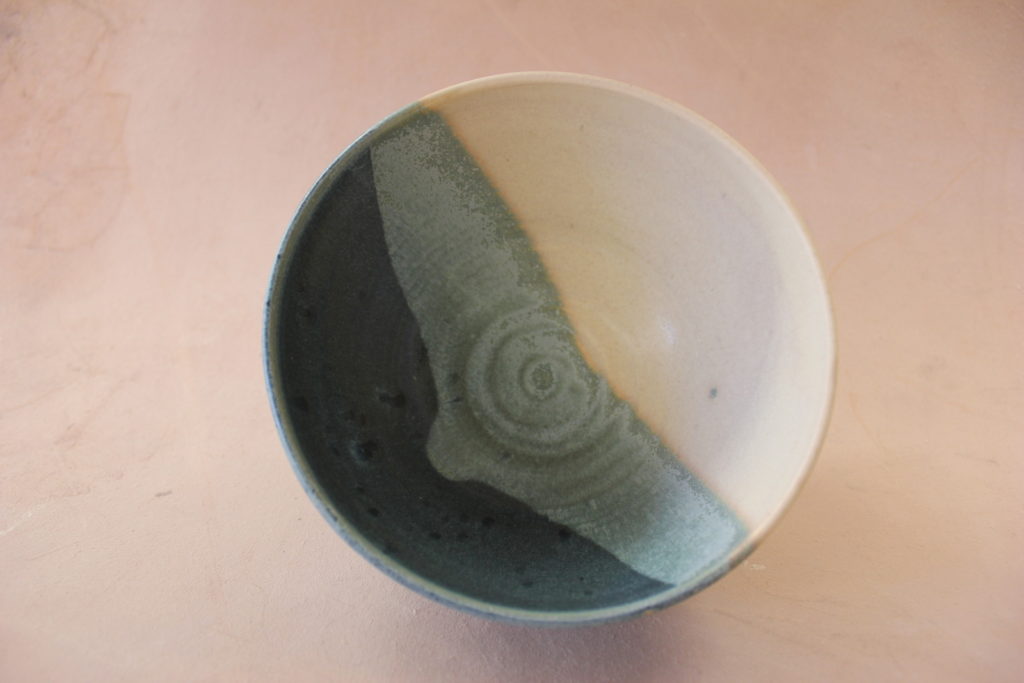
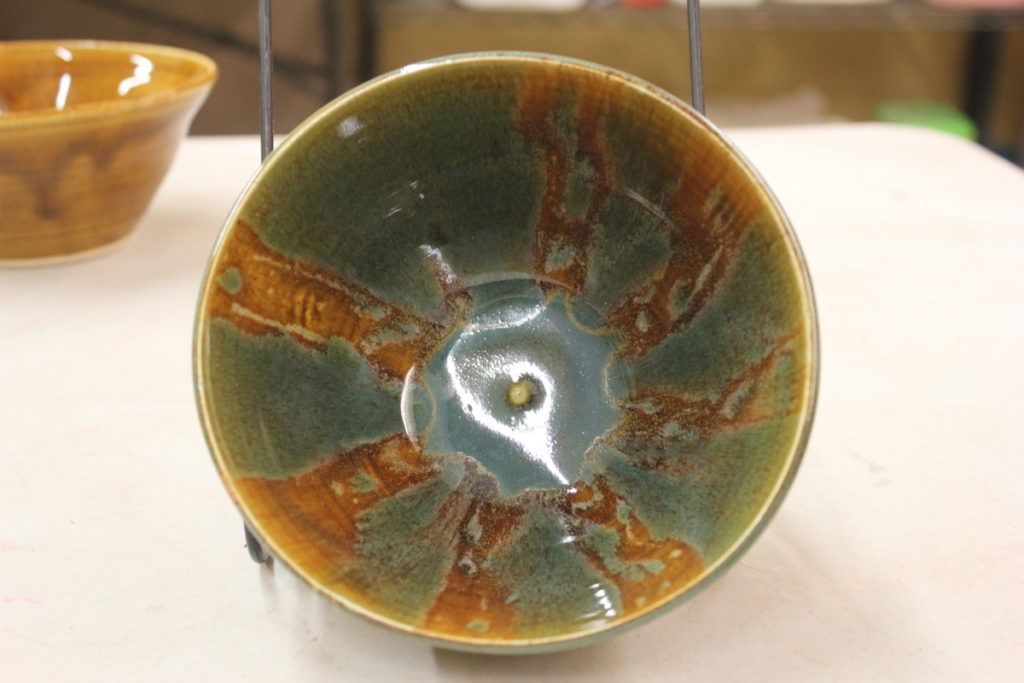
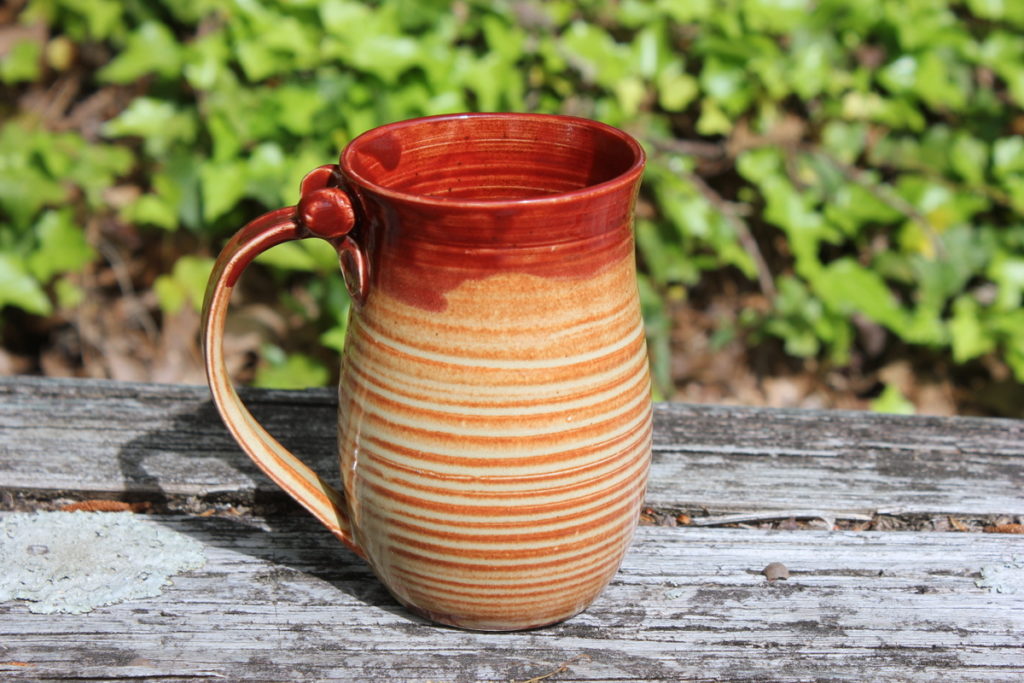
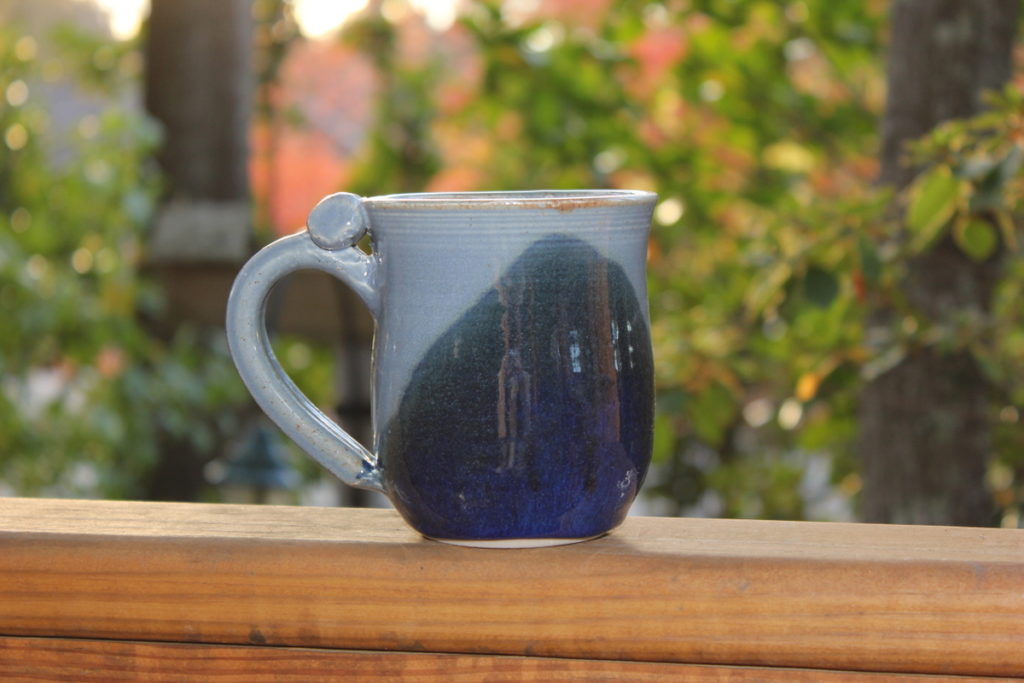
I did an experiment. per my last post, I was inspired by looking at the overlap between glazes. i like how the blue and purple interacted with each other, so I decided to expand the effect by overlapping the entirety of the purple and blue rather than just a little section. I did not know what would happen, but now that the firing is out, I am pleased with the results.
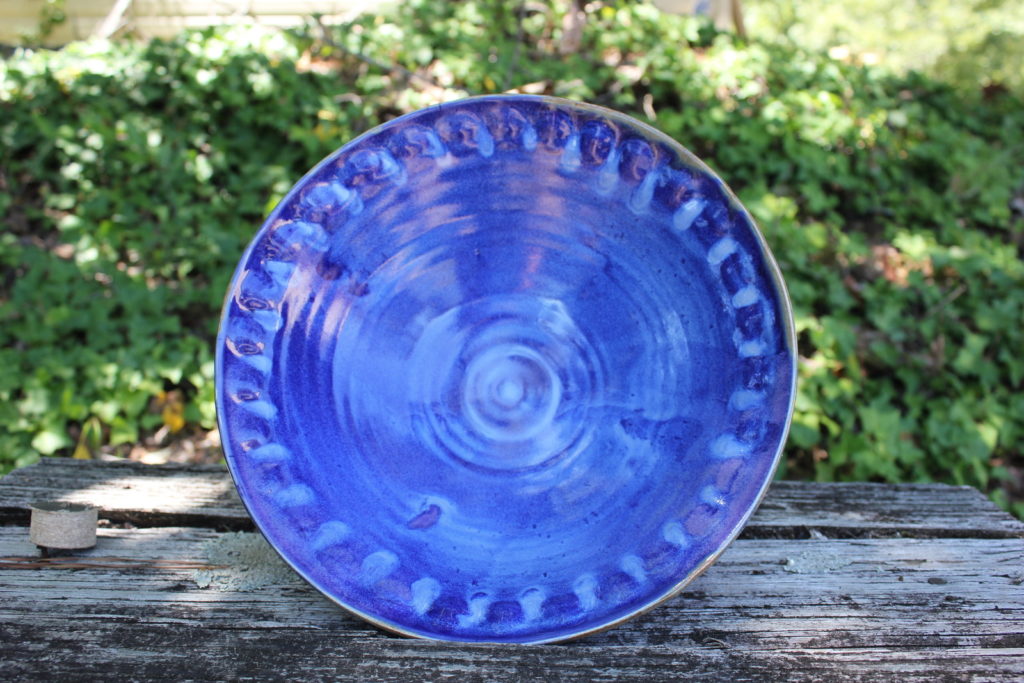
The swirls in this bowl come from pressing the curve into the piece with my fingers. The glaze combo reacted differently due to the thickness of the piece. there is also a lot of interaction in the purple that the camera just does not capture.I think that this combo adds more variety than either of the glazes would by their own. This is one of the first times that I diverged from the usual method of just using two glaze colors.
One of the fears that I had with this new combo is that the glaze would run out of control, but it is apparently a very stable combination. in the foreground of the picture above, you can see where I dipped the blue to two different levels. I thought that I would like the one on the left more, but I find myself more attached to the mug on the right.
Experimenting is never easy to do, especially when you are risking a piece that you are attached to. But the path of growth often requires you attempt new ideas, ideas which are uncomfortable and uncertain. This time the risk has payed off.
Recently did a
firing. Mostly the same of what I usually produce, but this time I
tried something a little different. Usually for my blue, I stick to
one glaze to get the color, but this time I used an overlap of semi
matte purple with the blue. I got this idea from looking at one of my
cups that had this same pattern on it, but for this time I am
applying it deliberately and at a larger scale.
I like how the color
looks, and I also like how it interacts with the throw lines. It has
been a while since I have experimented with my color options, but fot
this firing I wanted to try something to make my work look a little
different.
My goal in the
longer term is to develop a body that is unique to me. I feel that I
have the forms themselves developed to the point where I need to look
beyond just a simple form to further my work. One of the things that
I want to avoid in doing this is to simply slap on some tacky
decorations, like a heart or an easter bunny, etc. I want some thing
that is subtle and intuitive on a subconscious level, something that
takes maybe a little though to understand what it is exactly that
makes you appreciate it.
I am getting
pictures of this firing, as well as the last, to build into a
portfolio to apply for a Mfa program. I feel that getting an extended
viewpoint from people with a different artistic background to provide
me with a way to recognize and challenge my subconscious assumptions
about the nature and meaning of art. I don’t know if they will want
someone with my background, but I at least want to
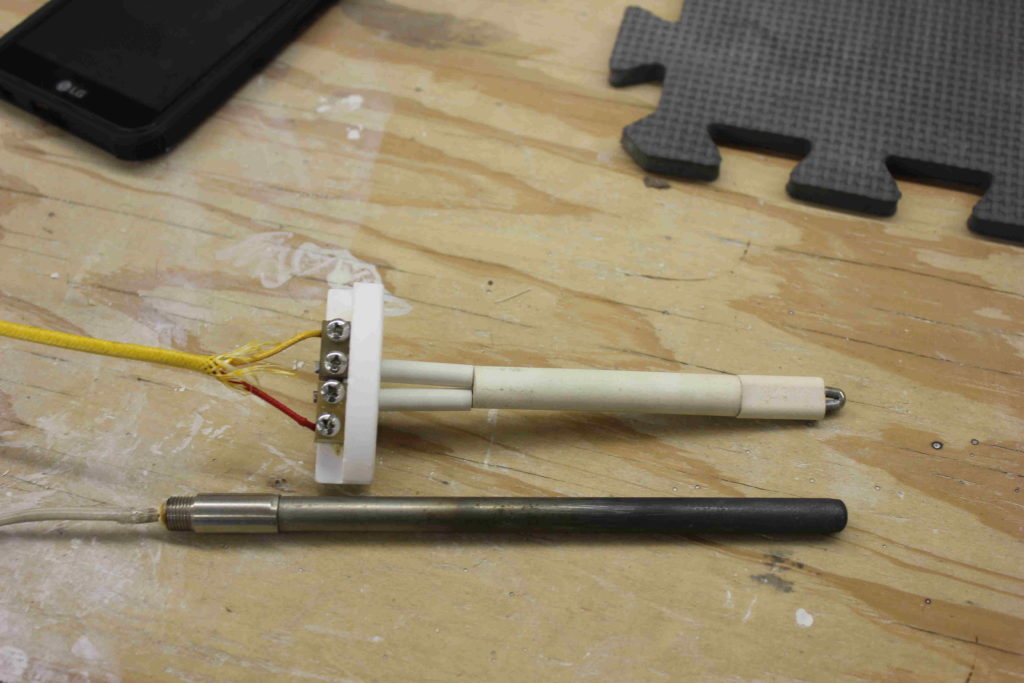
An electric kiln is a wonderful thing, but at times it can be frustrating. On a recent firing, my controller indicated a firing error, and I had to find the cause. there were three possible culprits
the relays. these are automated switches that turn the elements in the kiln on and off.
the elements. these will wear out over time. eventually they fail to heat to the needed temperature and will cause the kiln to misfire.
the thermocouple. this is the kilns thermometer. the circuitry in the electronic controller looks at the temp given by the thermocouple to see if the firing is on schedule.
One of the more important skills you can have is problem solving. With careful note-taking and observation, you can often frequently narrow down the list of causes. I had noted earlier in the firing that the temperature seemed to be jumping around strangely, not rising when the elements were humming and seeming to cool much faster than the natural tendency of the kiln at that temperature range. This led me to suspect the thermocouple had worn out to the point where it was not sending reliable information to the kiln’s controller.
The next thing I did was look up the error code in the kiln manual, which listed the three above culprits. I was confident that the thrermocouple was the problem, but I wanted to be as sure as possible. I performed what the kiln manual called the full power test,looking directly at the elements as they fired. This is what i saw and concluded:
the relays were functional beasuse all section of the elements were lit up
the elements were not disconnected. while they were somewhat worn, they did not look worn enough to be the source of teh problem
with both my notes and the results of this test, I felt confident that the problem could be solved by replacing the thermocouple. After that was done, I loaded bisque ware and hoped for the best. The kiln, with the new thermocuple in place, fired the work up to temperature and it seems i have my kiln back in working order.
summery:
Always be sure to take notes of your firings. records can point the way to the source of a problem if things go wrong. record at least the cone, firing time, and date of your firings. Try to get an intuitive understanding of what the kiln sounds like when it is firing so you can better guide your guesses to the true source of the problem. try to devise an expriment that can confirm or deny potential sources of a problem. Don’t be afraid to talk to the manufacturer to get their insight to what the potential source of the problem might be.
For a long time I have never used kiln wash on my shelves. I did not think that it was necessary because I wax the bottom of my pieces and I use glaze that does not run. I have always seen kiln wash as being just for the protection of kiln shelves from glaze overruns. It was not until I did some reading that I discovered the second use of kiln wash.
What is this second use? Well, it is to allow the pieces to move smoothly as they being fired. As the kiln heats up and cools down, a piece will grow and shrink as it changes temperature. Because the clay and the kiln shelf are different materials, they will have different coefficients of thermal expansion. What that means is that they get bigger at different rates. This can lead to stress on a piece that will cause it to chip where those differences become too great for the pot to accommodate.
Where the kiln wash comes into play is that it will allow the piece to move more freely with regards to the shelf, preventing the chipping on the bottom of the piece. when I first got my kiln, I notices this chipping and designed around it, or would make extra pieces to counter the risk of chipping.
So, what is kiln wash? It is essentially a refractory that resists vitrification. It doesn’t “cook” until a higher temperature than the wares that sit on top of it. I bought a pre-made kiln wash for about six dollars, and I can say with confidence that even without glaze overruns that it is a good investment. The kiln wash chip protection will let me return to some ideas that I ruled out in the past.
Saw the results of the third round of glazed bowls I have done for bowls of hunger. I am using the glazes at the Denson center for the arts in Opelika. In February they will sell the bowls to raise funds to feed the hungry around the Auburn-Opelika area.
I like two things about this glaze. It is more matte than the glazes that I usually work with, and the glazes interact well with each other. I got the color combination from the Denson art center. I have enjoyed seeing all the color combinations on the bisque ware that I have dropped off. In my own studio I have a limited color palette to save space, and the colors that I work with tend to be shinos and blues. the glases are also more shiny as well.
One of the things that I like in the bowls glazing is that the throwing lines are visible. this gives a hint to the story of a Piece as you see the lines come though a piece. It seems a struggle for me make sure that I can give a piece identity while balancing the time constraints inherent in making production work.
I plan to head out to the Denson studio tomorrow. Seeing the results from these bowls have given me some more ideas in my mind to experiment with. I want to see how the hino (white part) will interact with other glazes.
I have been trying to get to a working definition of art. It is hard to transition from having just an intuitive feel of what it is, to being able to define it at any length. I have been reading various essays from people such as R.G Collingwood and other to get a better feel. there are hundreds of pages on the subject, and the material does not lend itself to being easily understood, but that same depth has given me a better framework to build my own understanding of the subject.
This idea has been thought about for countless centuries, and achieving a perfect answer may be impossible, but I think i can get a idea of the definition of art that is good enough for me. I want to see how much , if any , the use of automation and industry inherently alters the quality of arts.
Industrialization replaced many craftsmen during the nineteenth and twentieth centuries. One of the influential craftsmen of the time, William Morris, stated that machinery was “altogether an evil”. he saw what seemed to be a race to the bottom as factories comprised on their work to slash costs and time. but, He also stated that machines could “reduce the hours of labor” needed to crate a product of a given quality.
This leads to to idea that i am trying to express: That the creation of art and craft requires the exchange of time for quality though labor. machines can let the artist perform the exchange at a more favorable rate. An artist must know the nature of their work to know what parts can be streamlined. What if a piece could have more expression, more unique identity, for the given amount of time that a creator invests in it?
I am also getting the notes that I have been reaching together so that I can go though them more easily, now that I have a large amount of notes, it is time to get them organized in a more useful manner. My second batch of bowls for bowls of hunger shroud be fired in Opelika. I will get pictures of those up soon.
Still getting notes together for my ideas on an artists statement. the challenge when I was in college was getting my notes stretched out enough to fill the length requirements, now it is in compressing about 50-100 pages of notes into a brief artist statement. though my research i have gotten a more in depth idea of how technology and craft interact with each other.
One of the things that interested me in my research was finding out that many sculptors were done in stages. the bulk of the work was done by one group, and the artist would come in later and shape the defining details. Yet, the work as a whole is still fully belongs to the artist. Trying this in back to pottery, where does the potter transform the piece of clay into their finished idea?
Towards this idea, I built a centering arm and made two sets of pots, one fully made by hand processes and the other made with clay made and opened with a centering arm. I finished them up to look as identical as possible, and realized that I could not readily tell the difference that introducing the machine had made. I now believe that there are two sets of processes that are involved in making a piece of art: extrinsic steps done merely out of necessity, and the intrinsic steps that are used to define a piece and give it meaning. what exactly those processes are are hard to define and will vary form person to person, and piece to piece. One must neglect to develop the extrinsic process because they reveal new creative options to explore to the attentive craftsman.
Departing from that, I looks like I have visitors. I’d like to say thank you for your visit, try not to mind the posting neglect to much and feel free to enjoy the galleries.
I am exploring ways to make my pottery better, and one of the areas that i want to explore is handles. they are currently pulled handles, bit recently I have began to explore the idea of modifying slab handles. When I was first making mugs, I could never get handles right. I started with using rings of clay cur from a cylinder, they were serviceable enough, but they always seemed crude, I had given up on the more traditional pulled handles because they had seemed out of reach. not great, but good enough.
Two years later, I had undertook an apprenticeship at the Ozark folk center where again I tried the pulled handles. They were still not up to par, but the experience that I had developed with the clay had allowed me to make something better than what I had previously accepted. after a few more years, I had gotten the pulled handles to where I was satisfied with them. when I was struggling with the handles for the second time, frequently my handles would slump over. To counter this, I began to attach a bar of clay at the top of the handle to strengthen the bond between mug and handle. I came to like the way the bar felt in my thumb when the center was pressed down . This was the beginning of my thumb rest.
Recently, I have began to feel that the handles can be further developed. overall I feel satisfied with the technical aspects of the handle, but now I want to create a handle that will satisfy several competing aims. I want it to be quick to make, but also break me out of what seems to me like stagnation in my mugs. Towards this end. I have been experimenting with slab handles that have been modified by pulling. so far, I have had about 40 new mugs made with this method, and so far it seems that I have been able to use this method without sacrificing craftsmanship. As I work with the idea, I grow more certain that somehow I am on the right track to making a more interesting mug.
Recently got a load of paper clay pieces out of the kiln. Will have a gallery of it up soon. thinking that I am making real progress on the write up of the centering arm preamble.
having the courage to bring everyday beauty into a world that is sometimes ugly